Pages

Thursday, November 21, 2019

Mount Washington in Fall

We weren't planning on summiting that day.  My parents had agreed to watch the kids while we took an "adult hike".  I let my husband choose - knowing he would pick something around Mt. Washington - his favorite peak.  We started from Pinkham Notch Joe Dodge in the clouds and fog.  The visibility in Tuckerman Ravine was awful, but wanting to get a little more exercise we decided to climb the Boot Spur Link up to Boot Spur Trial.  As we continued along the ridge, I heard Matt call "LOOK!".  The clouds parted and we were soon looking at Mt. Washington with a backdrop of blue.  Below us the under-story of clouds provided a blanket over the valley.  It was then we decided to go for the summit.
Boot Spur to Tuckerman Ravine Trail

Here's how to recreate this adventure...


Adventure:  Mt.Washington summit loop via Tuckermas, Boot Spur, Davis, Tuckermans, Nelson Craig, Alpine Garden, and Lion's Head.

Getting there: Our adventure began at AMC Pinkham Notch Visitor Center.  To get there, take Route 16 north out of North Conway.  At the 302/16 intersection, turn right to stay on Route 16.  About 11 miles from the intersection you will reach the visitor center on the left.  There is a large parking lot, AMC visitor center/dining hall and Joe Dodge Lodge.  The Tuckerman Ravine trailhead is located directly behind the main visitor center building with a well marked sign and is the starting point for many of the other trails that come off it.
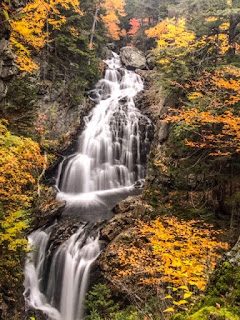
Crystal Cascade on the Tuckerman Ravine Trail near Pinkham Notch Visitor Center.

Trail: This hike involved many trails.  There are numerous stories of people who have gotten lost in this region.  It is important to use a AMC trail map (available for purchase in the visitor center) and familiarize yourself with it before departure.  Below is the way we took...

Part 1: Visitor Center to Hermit Lake Shelter
We started by taking the Tuckerman Ravine trail from Pinkham Notch.  This trail is wide, a steady uphill, and uneven terrain.  My mom once asked "Is this a dried up river bed?" and that statement perfectly describes the trail.  Along the way, enjoy views of Crystal Cascade - a photogenic waterfall.  This section is 2.4 miles one way and ends at a shelter deep in Tuckerman's Ravine.

Part 2:  Hermit Lake to Boot Spur
From Hermit Lake Shelter, we took the Boot Spur Link...up.  I've taken this trail with Matt a few years ago, and we took it down.  It's one of the steepest trails I've ever done in the White Mountains and not for the weak knees.  When you get to the ridge, the link meets up with Boot Spur Trail.  Continue up the Boot Spur trail until you at the Davis Path intersection. This section is 1.3 miles.

Part 3: Davis Path to Tuckerman Junction
From Boot Spur, take the Davis Path toward the summit.  This exposed rocky trail is marked with cairns.  Turn right at the Lawn Cutoff and continue towards the summit.  Clear days provide stunning views of Mt. Washington's summit and surround ridges.  The Lawn Cutoff ends at Tuckerman Junction where five points of trail meet. This section is 1.0 mile.

Part 4: From Tuckerman Junction, take Tuckerman Ravine Trail the last half mile to the summit.  This steep climb is covered in boulders and extremely exposed and steep.  Emerging at this peak can be somewhat anticlimactic since the Auto Road and Cog railway brings non-hiking tourists to the summit it can be crowded and busy.  This section is 1.0 mile.

View of the Mount Washington summit from the top of Boot Spur


After a warm beverage and bathroom break in the summit's visitor center, we headed back down a different way.

Part 5: Nelson Craig Trail to Alpine Garden
From the summit, we took the Nelson Craig Trail which parallel's the Auto Road.  At the Huntington Ravine Trail, we turned right for a short distance until it met with the Alpine Garden Trail. Huntington Ravine Trail is dangerous and never recommended for decent. We decided to take the Alpine Garden trail which cuts back along the ravine and reconnects with Lion's Head trail and Tuckerman Ravine Trail. This section is 1.9 mile.

Part 6: Lion Head Trail to Tuckerman Ravine Trail
After 0.9 miles of the Alpine Garden Trail, it reaches Lion's Head Trail.  From here we took the steep and sometimes technical Lion Head Trail down the mountain.  At 1.1 miles, it reconnects with Tuckerman Ravine trail just below Hermit Lake.

Part 7: Tuckerman Ravine Trail to Pinkham Notch Visitor Center
We finished the hike by retracing steps down the river-bed-like Tuckerman trail back to the Pinkham Notch Visitor Center.  This is about 2 miles. Done!

Image result for mount washington trails"
Photo of Map. All hikers should have a purchased AMC map.
Difficulty: Strenuous and Challenging

Distance: 10.7 miles using this path.

Fall Foliage at its best on the Tuckerman Ravine Trail

Recommendations:

- Each year there are tragic stories of injury and even death on Mt. Washington. This peak boasts the most extreme weather in the world and hikers often underestimate the challenge because its relatively low elevation.  Plan ahead and be prepared.  Matt and I each packed multiple layers including base layers, rain layers, and multiple poly blend warm layers - plus warm hats, gloves, and scarves.  We carried 2 L of water a person, food, and a large first aid kit.  We also carry the AMC map. Be prepared to scrap your plans based on weather.

- Parking is available at Pinkham Notch visitor center but is very popular and crowded in summer.  Plan ahead by getting there early.

Although Mount Washington wouldn't have been my choice of hike that day, I cannot imagine a better day to summit.  We were lucky with weather, visibility, and trail conditions.  Less than 48 hours later - the entire peak was covered in ice and snow.  Be safe out there!
Views from Alpine Garden Trail


You might also enjoy...

- Mt Osceola via Tripoli Road

- Mt Carrigan Loop

- One Night on Mt Liberty

Wednesday, September 25, 2019

Little River Loop Hike - River, Ridges, and Playground

I try to take my children - age 1.5 and 3.5 - on a hike once a week.  The perfect "hike" for my preschooler is easy walking, has points of interest, and a playground at the parking lot.  I've found that there are actually quite a few that fit these specifications in the Seacoast including Great Bay Discovery Center, Hanson Pines, and Stratham Hill.  One of our other favorite spots is Little River Park in Lee, New Hampshire which offers a network of trails, ample parking, picnic area, sports fields, and playground.  Sometimes, we visit for the park alone, but this is also where I first started taking my son hiking out of a pack when he was two years old.  My favorite path is to make a loop out of the river, ridge and forest trails.

Looking down at the playground from the Ridge trail.

Here's how to recreate this adventure:

Adventure: Little River Park Loop

Getting There: A large sign and parking lot marks the park and trailhead to Little River Park.  It is located on North River Road (Rt 155) about four miles south of Rt. 4.  The physical address is 34 North River Rd in Lee.

Trail: When looking at the playground from the parking lot, there is a large painted trail sign on the right by the hill.  This shows the short loop Forest trail to the right (.4 miles), the River trail (.52 miles) on the left side of the parking lot, and the ridge trail (.28 miles) straight up from the sign.  While I have done all of these separately, my favorite choice is to combine them all in a loop that is about two miles.
Trail map near parking lot


To do this, start with the River Trail (red) which starts from the left side of the parking lot.  This trail skirts the edge of the park and eventually dips down to Little River.  It ends with a moderate climb up to a residential street (Lee Hill Road).  To continue the loop, turn right and walk along Lee Hill Road about 0.1-0.2 miles until you reach the trail entrance on the right.  The trail will skirt private property and dump you back into park boundaries on the Ridge trail.  This is my favorite part of the trail.  From elevation, you see the park below as it winds along the ridge.  As it turns back down towards parking, hikers have the option to veer left into the Forest trail.  This offshoot, takes you into hemlock and pine forest before winding you to the parking lot.   It is an easy trail with some gradual elevation changes that make it more interesting.  For such a short loop it's nice to experience river, ridge, and forest views.

River Views

Difficulty:
Easy

Distance: Total loop including road portion and forest loop is approximately 2 miles, but you can make this shorter than a mile by just doing one portion.
Playground and pavilion at Little River Park

Recommendations:

- While this park is usually sparse, when youth leagues are using the fields, the parking area can be crowded.  That said, I've never seen it fill. 

- Dogs are allowed on leash.

- The picnic pavilion can be reserved, so don't be surprised if a birthday party is using it on a sunny summer day.

- There are no permanent bathroom facilities but often port-a-potties in the parking lot.

- The playground is perfect for age 2-5.  It has the most epic sandbox I've ever seen, complete with trucks and sand toys that have been donated to the park.

This is a perfect destination for a family with small children or someone looking for an easy neighborhood nature walk.  For awhile it was located next to my children's daycare and we visited multiple times a week.  It is a well kept park hidden in a quiet country town.

Enjoying Little River with my kids.

You might also enjoy the following adventures:

Great Bay Discovery Center and Hike in Greenland, NH

Winnie the Pooh Hike in Barrington, NH

Hanson Pines Hike and Playground in Rochester, NH


Tuesday, September 17, 2019

WM Gonic Trails - River Views and Waterfalls

I've blogged this one before. The Gonic Trails on the Waste Management land in Gonic (Rochester), New Hampshire is probably my most hiked trail in the Seacoast.  It's about 5 minutes from my house and provides river and waterfall views, easy to moderate walking, and limited mileage - perfect for a quick after work dog walk or Saturday family morning stroll.  I also love doing it as a winter hike or snowshoe.  After posting photos of it on my Instagram stories this week, I realized that the only post I had about it was for deep snow and winter walks.  It's a slightly different experience when there's no snow on the ground.

Waterfall views on the Gonic Trail.

Here's how to recreate this adventure:

Adventure: WM Gonic Trails in Summer/Fall

Getting there:  The main parking lot for this trail is located on Rochester Neck Road.  Take Rt 125 to Rochester Neck Road (across from 1st City Motors Auto Dealer).  The parking lot is located on the right about 0.7 miles down Rochester Neck Rd.  Park in the gravel lot.  There is a sign in the parking lot that says WM Trails.  Parking is free but there are no restrooms.
Trail Sign in parking lot (with map)
Trail: There are three trails in this system - blue, red, and yellow.  There are multiple opportunities to take a loop (see map).  My favorite is to start by taking the yellow trail toward the waterfall.  When facing the parking lot from the road, this trail starts to the far right.  This path is wide and easy.  It travels through hemlock forest on the outskirts of the waste management land.  There is a slight decline and a fairly straight stretch.  When you reach the Isinglass river, you can see remnants of a bridge or damn.  The trail curves left and goes down a moderate rocky area, past a rock wall to low area where you can approach the waterfall.

After enjoying the waterfall, continue on the yellow trail (trail markers on trees).  It will wander up and down with small elevation changes until it drops back to the river and it meets the Red Trail.  Here I continue with the river on my right until I get the second offshoot of the red trail.  If you continue straight here on yellow, you will go multiple miles more to a different parking lot.  There is a sign present which warns that the red to the left is the last option to loop back.

Take Red up a steep incline.  After about 20 feet, the trail levels off again and you will enjoy an easy walk back to the parking lot through hardwood forest.
Trail Map available here.

Difficulty: Easy with a few short/steep portions.

Distance: The yellow to red loop is about 1.5 miles.
Yellow Trail

Recommendations/Additional Information

- There usually is ample (free) parking in the dirt lot.  At times it can get crowded on hot summer days.

- Leashed dogs are allowed.  Be prepared to see them on trail.

- There are no bathrooms available at the trailhead.

- For an even longer hike (or different approach), hike the out and back yellow trail.  You can also access this trail further down the Rochester Neck Road on the right.  It's labeled Isinglass River Park.
Yellow/Red Trail right before taking red back toward parking lot.

I've hiked this trail in every season and really enjoy all that it offers in such a reasonable loop.  It's one of the many short, yet beautiful scenic hikes in Seacoast New Hampshire.  
Isinglass River in September

For similar experiences, check out:


Winnie the Pooh Hike in Barrington, NH

Hanson Pines in Rochester, NH

Pickering Ponds in Rochester, NH

Sunday, August 18, 2019

Summer 4000 footer - Mount Osceola via Trail on Tripoli Road

Back in May of 2015, I headed up to Tripoli Road to solo hike Mount Osceola.  Unfortunately, I discovered that in early May, the Tripoli Road is still "closed for winter" and I couldn't hike it.  I ended up taking the nearby multi-use Livermore Trail for a day hike and blogged about it.  It's now over four years later, but I decided to try again.  This time with my friend Kaley and her two dogs.

When looking for a hike to tackle today, I wanted something with a good view that wouldn't break us - neither had been doing strenuous hiking in the last couple months.  My choice was perfect! This moderate 4,315 footer is a steady out and back climb without any major slab or technical difficulty.  If you can just keep climbing up for 3.2 miles up and then back, you're in for the reward of spectacular views of the Sandwich Range.

View from Osceola summit.  Photo taken by my friend Kaley.

Here's how to recreate this adventure...

Adventure:  Mount Osceola via Mount Osceola Trail on Tripoli Road

Getting there:  We followed cell navigation to the trail head.  It took us a slightly different way than some websites but made good time and wasn't hard to find.  From I-93, take exit 28 for NH-49 toward NH 175/Campton/Waterville Valley.  Then turn right onto NH-49 E/State Hwy 49 E. In 10 miles, take a left onto Tripoli Rd.

Tripoli Road is only open in summer and is in moderately-poor condition for a paved road.  We dodged pot holes while slowly driving the couple miles to the Mount Osceola Trailhead.  There is a parking area but even by 9:00 am on a Sunday, it was full and we parked along the road with other vehicles.  There are outhouses at the trailhead as well as a parking fee (currently $5 a vehicle - bring exact change or check).
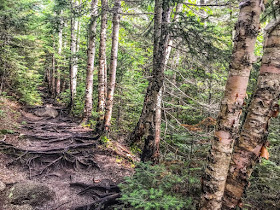
Roots and Birches

Trail: This is a moderate climb - especially for a White Mountain 4,000 footer.  The trail starts with a gradual climb and continues going up for the entire trek.  The ground cover changes back and forth from rocks to roots and packed dirt.  We were able to keep a steady pace without involving climbing or grabbing trees for support.  I really fell in love with the mossy rocks lining the trail in the hardwood forest.  As we gained elevation, we were able to see glimpses of the view through the evergreen branches.  The last mile of the trail was the most challenging - with slightly steeper grade and short slabby sections which were wet from the previous nights storm.  Still, nothing too intimidating.

Love these moss covered rocks
The view from the summit was beautiful!  The lookout is an open slap that gives you about a 180 degree view of the mountains south of the Kancamagus Highway called the Sandwich Range.  It was a moderately trafficked trail and there were probably 4-5 other groups up there enjoying the sunshine and view.  After a sun and snack break, we headed back down to the car the same way we had come up.  Some hikers decided to continue and bag "East Osceola" - another 4,000 nearby, but since it doesn't have a view, we weren't interested.

Difficulty: Moderate

Distance: 3.2 miles one way, 6.4 out and back

Recommendations:

- This would be a great hike for someone wanting to try their first 4,000 footer.  Although it was a steady climb with rocky trail, there were no technical skills needed.

- Remember your $5 for parking envelope.

- Don't make my mistake and assume the Tripoli Road is open in May. Summer only!

- This was a moderately trafficked trail and very dog friendly.  About a forth of hikers had dogs off leash.  Few asked if we wanted them to leash them.

Although I actually summited this mountain back in my guiding days, I had never taken the approach from Tripoli Road.  As a mom of a one and three year old, I don't get the opportunity often to take a full day to drive to the White Mountains and do a day hike.  I have to choose carefully!  This was the perfect hike for a summer day.

Please leave comments and questions below.  Follow us on Facebook at The Freelance Adventurer. or on Instagram @freelanceadventurer.


Steady uphill climb gave these rewards
Kaley's dogs - Dexter and Cooper

You might also enjoy the following:

- Mt Carrigain Loop - 4000 Footer and More

- Mount Pierce in Late Spring

- Advice For Hiking in the White Mountains

Saturday, August 17, 2019

Seacoast Moms Blog: 3 Secrets for Successful Tent Camping with Babies and Toddlers

For summer,  I decided to share some secrets I've cultivated from three years of camping with babies and toddlers.  As a regular contributor to Seacoast Moms, I shared my thoughts on a summer post HERE.  I'd love to know what you think!  Visit Freelance Adventurer on Instagram and The Freelance Adventurer on Facebook to give me feedback and see day to day adventures in the Seacoast of Maine and New Hampshire... and beyond.

More Ideas

Looking for a place to camp?  Check out a past post of Best Tent Campgrounds in New Hampshire.  Or see what it's like to Rent an RV at a KOA

camping with babies and toddlers
Camping last summer with my 2 year old and 3 month old.
Camping with my son when he was 4 months old


Saturday, July 27, 2019

Girls Trip 2019: Kayaking in Johnstone Strait, British Columbia

Girls Trip 2019 took me to Johnstone Strait in British Columbia for four days of kayaking in the wilderness.
Last fall, I was already thinking of where I wanted to go for my yearly "girls trip" with friends.  Past trips had included Iceland, Italy, New Zealand, Colorado, Newfoundland, Maine, Michigan, and so much more. My parents had agreed to watch my young children in Portland, Oregon for the week so I started tossing around ideas for the Pacific Northwest.  My parents are experienced travelers and adventurers.  They suggested taking a kayak trip with Spirit of the West Adventures in Johnstone Strait, British Columbia with the promise of seeing orca whales in the wild.  SOLD!  Over the next few months, I assembled a group to join.  My sister, Kelly, reached out to her friends as well which made this year the largest group in a decade of doing these trips- we had ten!  We booked the Johnstone Strait Ultimate Tour for July 12-15, 2019.

The only problem with taking a trip with Spirit of the West is getting there!  Our group was coming from all over the country - Maine, New Hampshire, North Carolina, California, and Washington.  Even though the kayak was only four days, the actual trip took seven because of the travel.

Here's how to recreate this adventure:

Day 1 - Travel to Vancouver, British Columbia

View from Vancouver waterfront
I needed to leave from Portland, Oregon because that's where my kids were staying.  Matt and Leanne flew to Portland to keep me company on the first (and longest) section of driving.  We rented a car in Portland and drove to the city of Vancouver.  The drive took about 10 hours including a border crossing.

I found that Vancouver's West End lodging is very expensive, even with a favorable exchange rate, so we opted to stay at a hostel.  We were able to get into town in time to enjoy some sightseeing including sunset over the waterfront. I enjoyed dinner and cocktails at Mary's on Davie which was having their "Drag Queen Bingo Night".  Fun!

Day 2 - Travel to Quadra Island, British Columbia

Another day in the car.  We caught a 10 am ferry from West Vancouver to Vancouver Island's city of
Lovely loft room at Tsa Kwa Luten Lodge
Nanaimo.  Be sure you are getting to the correct ferry entrance! We made the mistake of pulling up to the pedestrian entrance only to have to get back on the highway four exits until we found the right place.  This could have been catastrophic if we weren't already early. From Nanaimo, we drove up the island to the town of Campbell River.  We got in line for the ferry to Quadra island (no reservations offered) and since the current one was full, we had to wait an hour for the next.  No worries - we saw seals in the harbor and grabbed snacks at a local pharmacy.

Once on the island, we drove a short distance to Heriot Bay Inn where we met our guides and owner of Spirit of the West Adventures owner, Rick, for our Pre-Trip meeting.  It was the first time our entire group got to meet each other!

After the meeting, we enjoyed a delicious dinner at the Inn before driving down island to our lodging at Tsa Kwa Luten Lodge. This place was BEAUTIFUL!  I highly recommend the location and venue.  The lodge was gorgeous and super affordable compared to Vancouver.  They even had a loft room with three queen beds.  Before bed, we drove down the road to Cape Mudge Lighthouse where we watched the sunset.  I was sad we couldn't explore this area longer.
Sunset from Cape Mudge lighthouse on Quadra Island
Day 3 - First Day of Kayak Tour - Water Taxi to Camp and Short Kayak
2.5 hour taxi boat took us from Quadra to camp

We were finally ready for our kayak tour!  This place is remote.  To get there, we took a water taxi 2.5 hours into Johnstone Strait to Spirit of the West's remote camp.  The taxi pilot pointed out notable scenes, told about the history, and was a friendly introduction to the area.  What an enjoyable boat ride!

Once at camp, we all helped unload the gear from the taxi boats and got to explore camp. It is GORGEOUS!  Tent platforms are sprinkled on the cliff side with views of mountains and water.  The open air dining area, kitchen, toilets, and shower were all clean and welcoming and perhaps most surprising of all is the wood-fired hot tub on the cliff side.  I was so excited to be there!
Short paddle on Day 1 - got to see abundant intertidal life
After choosing tents and setting up our sleeping area, we met with the guides and got to get out on the water.  In about an hour kayak, we explored the intertidal life and local scenes.  I saw sea stars, sea cucumbers, urchins, and more.  As marine biology majors, Leanne and I were really geeking out over the organisms.

We wrapped up the day with appetizers, free time, salmon dinner, and a soak in the hot tub.  I fell asleep to the sound of water lapping on the rock beach below.  I was in paradise!


Glamping!  Wood fired hot tub
This is lunch - Spirit of the West Style!
Day 4 - Kayak and Hike to Eagle Eye

After a delicious hot breakfast and coffee, we took off for a day of kayaking and hiking.  We enjoyed kayaking north in search of beautiful views and wildlife.  We stopped for snacks and potty breaks at rocky beaches.  Later we enjoyed a long lunch break with a wide spread of sandwich fixings, fruit, and veggies.

Another great stop was to hike up to Eagle Eye - a orca monitoring station.  At Eagle Eye, there was an informational talk by the volunteer scientists about resident killer whale behavior.  After the hike, we returned to camp hitting mostly calm, smooth waters for our return.
Again, we were greeted by appetizers, amazing meal of chicken and rice, and hot tub time!  I took up the challenge to jump off the cliff into the frigid sea before hopping in the hot tub.

Camp time was a great time to relax, socialize, and undwind
Day 5 - Kayak and Camp
Chose a double kayak with
my sister, Kelly, on Day 3

We headed the opposite way on this day.  Kayaking south, we had flat water for the first part of the day.  We pulled out at snack spots and enjoyed another lunch on a pristine rocky and driftwood covered beach.  Returning to camp after lunch, we hit some wind and slightly rougher seas.  I got my workout for the weekend on this day!

Nachos, tacos, and fondue were the perfect end to the day.  We realized our adventure with Spirit of the West was almost over.


Day 6 - Leaving Camp and Travel to Nanaimo

Our guides: Mac, Bob, and Nicole
The final morning, most of us opted to do an optional early morning kayak.  The tide was in our favor - a low low.  We saw amazing intertidal life and by guide Nicole's suggestion, paddled the 1.5 hours in silence.  The seas were the calmest we'd ever seen with the bluest skies of the trip as well.  It was magical!

Back at camp, it was bittersweet as we packed up our gear and cleaned out our tents for the next group.  Around noon, our water taxi arrived to take us back to Quadra Island.

Humpback!

As we boated down the strait, we reminisced about how (almost) perfect our trip had been - except for the one disappointment of not seeing any whales.  Then to our delight and absolute glee - our pilot spotted a humpback!  We got closer and watched as the whale essentially put on a show - tail flips, fluke slaps and more!  After about 20 minutes we left our whale friend and continued on.  Again, in a magical conclusion to our trip a pod of fifty or more dolphins bow rode our wake for another 10-20 minutes.  It was truly amazing.  All including our pilot expressed joy from the experience.

Completely elated, we pulled into Quadra, grabbed our rental car and got in line for the ferry to take us back to Campbell River.  From Campbell River, we drove to Nanaimo where we spent the night at the Coast Bastion Hotel.  We also had a fantastic Italian dinner in Nanaimo at La Stella Trattoria.

Ali and the dolphins

Day 7 - Travel back to Portland, Oregon

Nanaimo, BC

We took an early 6 am ferry from Nanaimo to get Ali back to the Vancouver airport for her midday flight.  We dropped her off at the Yaletown train station which would take her directly into the airport.  From there, Matt, Leanne, and I drove to Stanley Park.  We wanted to see the aquarium!

Now...Leanne and I have this observation, that on every girls trip, there's some sort of mishap - this is when the mishap finally struck.  Our tire popped right in Stanley Park!  After much frustration on the phone with tire stores and our rental company (thank goodness Matt had international calling), we were able to get the spare tire on.  Since we couldn't drive all the way back to Oregon on a spare tire, we arranged to exchange it for a new rental vehicle in Vancouver.  Matt was determined not to let this influence our plans to see the aquarium however, so we went there first.

After the aquarium, and with a new rental car, we booked it back to Portland just in time to get Matt to the PDX airport.  Leanne and I returned the rental car and went back to my parent's house.
Vancouver Aquarium

Girls Trip 2019 Wrap Up
Me and my companions about to part and get on the Quadra ferry

Girls Trips have brought on a whole new meaning for me.  Now, with young children, it's almost impossible to have five minutes to myself - let alone a week.  This trip is something I desperately looked forward to all year - time when I don't have to care for children, pets, house, and carry the mental load of the family.  I can feel free to socialize, exercise, and relax.

I couldn't do this trip without the amazing support of my parents - who cared for my children while I was away and wholeheartedly support travel and adventure.  I also am grateful to my best friend Leanne who has been my reliable and faithful companion every year.  As I discovered on this trip, her love language is the quality time she spends with me - and she shows it well.  Love you friend!  I'm also thankful for the other companions: Ali, Matt, Kelly, Trux, Lil P, Serb, Dana, Kama, and honorary Brad, Lyndsey, and Kelly.  Everyone was a blast!  Thank you also to our guides Nicole, Bob, and Mac - you guys were great.

Until next year...
Heaven

If you'd like to learn more about my trips or see more photos, follow me on instagram @FreelanceAdventurer and Facebook at The Freelance Adventurer.  Thanks!

Saturday, June 29, 2019

Pickering Ponds Loop - Easy Nature Trail in Rochester, NH

Pickering Ponds is an easy 1.7 mile loop trail located in Gonic, NH. 
Just down the street from me (literally) is a little trail called Pickering Ponds.  I haven't blogged about it before because like so many, I fall into the trap of whatever's further and more exotic, is better.  Not true at all!  This 1.7 mile easy loop trail is perfect for nature lovers, families, and dog walkers.   On a warm sunny day, I popped my 15 month old in a pack and met another momma, Jen, for a pack walk around the ponds and Cocheco river.  We were treated to sunshine, water views, and wildlife including - great blue heron, turtles, and waterfowl.

Here's how to recreate this adventure...

Adventure: Pickering Ponds Loop Trail

Unmarked road to trail head can be tricky to spot.
Getting There:  Pickering Ponds is (not surprisingly) located on Pickering Road in the Gonic area of Rochester, NH.  To get there from Dover, take 6th street toward Rochester.  Once you cross the town line into Rochester the street name changes to Pickering Road.  After you pass England Road (on right) keep a lookout for the pullout on the left.  It is not marked - but is a long paved driveway/road with a chain link fence at the end (see image to the left).  For navigation systems, it is opposite the house at 374 Pickering Road in Gonic.  Park along the "driveway" leading up to the fence. There is a prominent "No Hunting" sign.

Complete trail map available at rochesternh.net
Trail: The trail starts by entering through a large chain linked fence at the end of the driveway.  You will immediately get views of the ponds.  Jen and I started by walking north along Beaver Dam Road (see map).  This takes you along two large ponds.  I'm told they were originally planned as waste management ponds but have never been used for that purpose.  As a result, it's a favorite spot for bird lovers and you'll see many wildlife photographers if you frequent the ponds.

At the end of the ponds, we turned left along the fence and headed down into the Cocheco River Loop Trail.  This portion traverses through hardwood forest along the river.  It continues to be a wide and relatively flat trail.  This trail curves along the river and will eventually bring you back out to the ponds where you started.  Total - the wide loop is about 1.7 miles.

Hikers can easily shorted this adventure by just doing the ponds and skipping the river walk.

Jen and son checking out a turtle


Beautiful birch trees along wide flat trail
Difficulty: Easy

Distance:  1.7 mile loop with options for shorter

Recommendations:

- Spring and early summer this area can get very buggy.  We used bug spray for us and the kids.

- This trail is great for kids because it's easy.  It's also great for parents because it's relatively flat and wide which means, even though it's not paved, I'd say it is "stroller friendly".

- There are no bathroom facilities at the trail.

- Dogs are allowed but should be leashed.

- Parking is free.

- City of Rochester and Rochester Rec manage this property.  The government link to this trail is HERE.
Moms and kids at Pickering Ponds
Selfie with the kids at Pickering Ponds

We enjoyed our nature walk with our little ones.  I'll continue to try to focus on some local Seacoast gems in addition to "far away" destinations.


You might also enjoy these similar adventures:

- Hanson Pines Nature Walk in Rochester, NH

- Great Bay Discovery Center in Greenland, NH

- Wiland Pond Nature Walk in Dover, NH


Sunday, May 5, 2019

Hanson Pines - A River Walk in Rochester, NH

I first visited Dominicus Hanson Pines Park last summer when my son was taking swimming lessons through the Rochester Rec Department.  I noticed a trailhead in the parking lot, but without knowing anything about the trail, I was tentative to try it with two young children alone.  I reached out to social media to my peers at Hike It Baby Seacoast, but no one responded that they had the tried the trail. I forgot about it...until this spring when I saw a post on social media of a beautiful pedestrian bridge over the Cocheco river and a lovely trail.  Next, I reached out through Facebook to Rochester Rec and they were super accommodating - answering questions about the trail and even offering to hike it with us! I took the kids and discovered it’s a hidden gem of a city park - water views, gentle trail, huge trees, and a loop!  It is now part of our regular rotation of nature walks.


Pedestrian Bride along Hanson Pines Nature Walk


Here’s how to recreate this adventure…


Adventure: Dominicus Hanson Pines Park and Nature Trail

Getting there:  The park and parking lot is located right next to Spaulding High School in Rochester at 4 Yeagley Way.

Trailhead at Hanson Pines

Trail:  The trail is a loop that’s divided by a paved path.  It’s a little misleading since it looks like the trail IS the paved path, but it actually goes around the path.  The unpaved walking trail is a relatively flat, wide trail with a floor of pine needles and leaves. There are some roots and rocks, but it is an easy trail and could be accessible for someone with a jogging stroller.  The trail loop is 0.77 miles round trip. We made it a little longer by incorporating the paved path and making a sort of figure eight shape.

If you start by turning left at the trailhead, you will parallel the Hanson Pines pool and playground.
Trail map.  I highlighted the loop in yellow.
Red marks the paved path/bridge.
Next, it wil curve right down to the river.  There are multiple resting benches along the way. At the river, the trail curves right again and travels parallel to it. You will pass the intersection of the paved path and see the impressive footbridge.  Continue straight. Here, interpretive signs are available using a QR code on your phone. We saw muskrat, turtle, and waterfowl. The large pines were also impressive.

From the river, the trail curves right again and heads into a mixed forest of hardwoods and pines. Soon, you will get glimpses of Spaulding High School through the trees and once more the trail curves, taking you back to the well marked trailhead.

We have now visited this trail multiple times - we saw other families, couples, and dog walkers (leashed) enjoying the trail.  We have also tried it with my son on his balance bike. As a parent, I appreciate the playground as well!

Difficulty: Easy

Distance: 0.77 miles for loop

Recommendations:
  • Unless, the Hanson Pines Pool is open, there are no bathrooms at the park
  • Dogs are allowed on the trail but should be leashed
  • Parking is free
  • There are other small trails that weave in and out of the land. I haven't explored these (see map photo).


This is a great little strip of peaceful nature in the heart of an urban center.  It’s perfect for families with small children and/or anyone who’s looking for a short nature walk.


View from the footbridge
Happy hikers

Playground fun during hike


You might also enjoy these similar experiences:

- The Perfect Winter "Hike" with Toddlers 

- Winnie - the - Pooh Trail

- Willand Pond Nature Walk