Monday, September 2, 2013

Mt. Major is a Major Treat!

Brothers summit Mt. Major on their first mountain hike.

What better way to wrap up the summer than with a hike?  On this occasion, my friend Ingrid and I decided to hike Mt. Major - a tiny mountain (1750 ft) on the shores of the mighty Lake Winnipesaukee.  It was exciting having her nephews along.  The 5th grader and 8th grader had never hiked before and afterwards said that this adventure was the highlight of their summer!  The short mountain hike offered breathtaking views, varied terrain, and amphibious critters in the leaves.
Orange Trail begins as a gradual walk in the woods.

This is an perfect hike for first time hikers, families, and those looking for a short hike on a beautiful day.

Here is how you can recreate this adventure... 

Adventure:  Mt. Major hike in Alton, NH

Getting there:  I took Rt 16 North to the Alton exit.  Follow Rt. 11 West towards Alton.  The trailhead is a few miles past the village of Alton Bay.  The trailhead is a clearly marked parking lot on the left.  There is no parking fee and there are no bathrooms at the trailhead.
Climbing over and through
glacial erratics on Boulder Trail.

Trail:  There are two main trails to the summit from this trailhead.  We took the Boulder Loop Trail up and the Mt. Major Trail trail down.  This made a pleasant loop.  The Boulder Loop Trail (Orange Blaze) is slightly less traveled and the large boulders make it a better choice to navigate on the uphill.  This is accessed on the left side at the end of the parking lot.  
From the summit, we took the Mt. Major Trail (Blue Blaze) down.  At first there are some steep/slabby portions that would be very challenging if wet, but it gradually became easier as we descended.  Both trails travel through hardwood forest.  The boys enjoyed finding Eastern Newts and native frogs in the leaves and under rocks.  Evidence of large glacial erratic boulders dot the landscape and at some points provide a challenge on the trails.  Another point of interest was the rock shelter at the summit.  This was fun for kids to climb, and I imagine provides a relief to wind on blustery days.  
Both young and old enjoyed the trek up Mt. Major.  I'd love to do it again in the fall when the leaves are all changed!


Approaching the summit on the
Boulder Trail.
Difficulty:  This was an easy to moderate mountain hike.  Boulders and slab near the summit provided some challenges.  Those with poor knees should consider using trekking poles on the downhill.  It is a great hike for children because it provides unique and varied terrain with an awesome view.  Our 14 month old, 5th grader, and 8th grader all enjoyed it.  (The 14 month old was carried up.  :-) )  For more family friend hikes click "Family" on the Labels on the right.  

Distance:  The loop is about 3.9 miles round trip.  We did the hike in 2.5 hours which included a long lunch break at the summit.  

Recommendations:  
-  We (perhaps stupidly) visited this hike on Labor Day weekend.  When I arrived at the 50 spot (or more) parking lot at 10 am, all spots were already full.  By the time we left at 1:30 pm, parked cars lined the side of Rt 11 for a quarter mile.  This is a POPULAR hiking spot in summer and especially on holidays.  I recommend getting to the parking lot early and taking the less traveled Boulder Trail up to avoid crowds. Still, there was plenty of room for all.  As you can see in my photo below, don't expect a serene and peaceful summit.  Children, adults, and dogs socialized, ate, and played at the top of the mountain.  If you want a more peaceful experience, visit on a weekday and avoid the summer.  
Not-so-peaceful summit on summer holiday weekend.

- Bring at least 1 Liter of water per person, snacks, and appropriate hiking gear.  Even though it's a fairly short hike (3.9 miles), it's 1150 ft in elevation gain is enough to get your heart beating.  Take breaks and bring a windbreaker for the summit.  

The four of us really enjoyed this hike up Mt. Major.  From the summit we could see the tiny boats below zip through Lake Winnipesaukee and the tall White Mountains in the distance.  It was a joy hiking with two middle school boys on their first mountain climb.  They loved the experience.  This is the perfect family hike for first timers.  Enjoy!

The boys found newts and frogs!

Ingrid and I enjoy another hike together.


Please leave comments and questions below...

Tuesday, August 27, 2013

Hiking the (2nd) Most Climbed Mountain In the World

Approaching summit of Mt. Monadnock, NH.


Tough Mamma hiking with Baby in an Osprey hiking pack.
I've heard and read from multiple sources that New Hampshire's Mt. Monadnock is the second most hiked mountain in the world - second only to Mt. Fuji in Japan.*  I found this shocking, since growing up in Oregon, I had never heard of Monadnock.
So WHY is it so frequently visited?
To discover the answer, I took to the hills with my friend Ingrid and her adorable baby daughter for a day of hiking the second most frequently climbed mountain in the world.

Here is how to recreate this adventure...

Adventure:  Mt. Monadnock, Jaffery, New Hampshire

Getting there:  This mountain is in southern New Hampshire.  The trailhead was less than 2
hours from my house in Exeter, NH.  I took Rt. 101 West and switched to 202 West in Peterborough, NH.  From there, I took 202 W six miles to 124 W.  Stay on here for 2 miles and follow signs to Mt. Monadnock State Park.

And I thought it was going to be easy.
Red Dot Trail!
Trail:  There are multiple trails to the summit of Mt. Monadnock.  The most common ascent is taking the "White Dot Trail" up and the "White Cross Trail" down.  This makes a tight loop totally about 4 miles.  To avoid crowds and tight fitting spots with Ingrid's baby backpack, we took the less traveled Red Dot Trail up  and the "White Cross Trail" down.  Our trip was a little longer since the Red Dot Trail is 2.75 miles to the summit and then 2 miles via the White Cross down.  I enjoyed climbing through the hardwood forest, over boulders, and along the extensive and exposed ridge-line.
One of the nice things about this mountain is that there are multiple points of assent.  There are even trails from the nearby campground.  I'd love to go back and take another trail.  Perhaps that is one reason why this is so often climbed?

Difficulty:  I don't know why, perhaps it was the lower elevation compared to other mountain hikes (3,166 ft), but I had expected Mt. Monadnock to be a walk in the park.  Instead, I discovered a perfect day hike - combining interest through varied terrain including packed dirt trail, large boulders, and slab climb.  I'd rate it as a moderate trail in White Mountain standards, but there are a few challenging stretches (see bouldery rock trail photo above).

Tree Graffiti 
Distance:  Our hike was 4.74 miles round trip, but as stated above, you can take a variety of trails to shorten or lengthen this hike.  We look lots of breaks and enjoyed a long lunch at the summit with Ingrid's little girl, so our hike was about 5 hours round trip.

Recommendations:  I completely recommend that you hike Mt. Monadnock.  A few pieces of advice...

- If possible, go on a weekday - Ingrid and I were lucky enough to go on a Friday.  Even with this, the summit was crowded and the White Cross Trail was packed.  I can only imagine how nuts this popular mountain gets on weekends and holidays.  Be patient and consider taking one of the less used trails like the Red Dot to avoid the crowds.  Another recommendation would be to get there early.  We started our hike at 10 am and the parking lot was already crowded.

- Don't be fooled into thinking it's going to be easy or short.  Bring appropriate footwear, at least 2 liters of water per person and snacks.  You'll be sweating!
White Cross Trail. 

- Instead of taking your lunch break on the summit with the crowds, take a break along the equally open and expansive ridge line.  We had a nice long break at the junction of the Pumpelly Trail and the Red Dot Trail.  This gave us gorgeous views with privacy.

 I discovered that one of the reasons Mt. Monadnock is so frequently climbed is that it's a really wonderful mountain!  In just a couple hours, I got gorgeous views of green rolling hills, lakes, and the White Mountains in the distance.  The hike is moderately challenging and fun.  I can't wait to go back!

Pooped after a long day on the mountain!


*Mt. Monadnock, Wikipedia, 2013 http://en.wikipedia.org/wiki/Mount_Monadnock

Please leave comments and questions below.

Friday, August 23, 2013

Butt Burner in the White Mountains - Mt. Flume and Mt. Liberty Loop

Approaching Summit - Mt. Flume

Last weekend, Matt and I decided to take advantage of the great weather and head for the Whites.  When we lived in Maine, the closest areas to us were the hikes along the Kancamangus Highway and the North Conway area.  As a result, we stuck to that area.  Now, as residents of Southern New Hampshire, we are actually closer to the Franconia Notch side of the forest.

Views on our Flume/Liberty hike
This is a treat since Franconia boasts some of the best hikes in the Whites - including Franconia Ridge peaks like Lafayette, Lincoln, Liberty, and Flume.  On this beautiful day, we decided to tackle two of these peaks - Mt. Liberty and Mt. Flume.

This adventure included scrambling over boulders, absorbing stunning 360ยบ views, and feeling "the burn" in every muscle of your body.

Here is how to recreate this adventure...

Adventure:  The Mt. Flume/Mt. Liberty Loop

Getting there:  We drove up I-93 N to Franconia Notch State Park.  We parked at "The Basin" exit and walked south about a mile down the bike trail until it met up at the junction with the Liberty Spring Trail/AT.   *Many visitors also exit at the Flume Visitor Center and walk north up this bike trail a mile to the same junction.  Either way, you'll get there!


Matt uses a tree for support up the Flume Slide Trail
Trail:  We tackled these two peaks with a loop.  We headed up the gradual Liberty Spring Trail/AT for  0.6 miles and took a right onto the Flume Slide Trail.  This traversed through hardwood forest for a couple miles and had a few easy stream crossings of Flume Brook.  After 2 miles on the Flume Slide Trail, we reached...the "slide" portion.  The trail suddenly got very rocky, steep, slabby, and wet.  It was a "White Mountain Special" - forcing us to grab trees as support, dig our boots into rock cracks for a foothold, and grunt our way the last mile to the summit.  It's definitely challenging, exciting, and only suited for fit, skilled hikers.

I do not recommend trying to go down the Flume Slide Trail as part of the loop.  It would be very dangerous and even more difficult.  In total, the Flume Slide Trail is 3.3 miles from the junction to the summit.

At the top of Mt. Flume, we had beautiful views of Franconia Ridge, Franconia Notch, and the Pemigewasset Wilderness east of our spot.  We took a long break and then headed north along the Franconia Ridge Trail 1.2 miles to the summit of Mt. Liberty.  This trail takes to down into the trees and then emerges onto another beautiful 360˚ peak.

After drinking in the view again, we headed 0.3 miles further until we reached the Liberty Spring Trail junction.  We turned left, hiked 2.9 miles down a moderate trail to the bike path, and then the parking lot.  This included hiking through the Liberty Spring Campsite - a popular AT stop for thru-hikers and weekend warriors.

Summit of Mt. Liberty

Difficulty:  As I mentioned above, the Flume Slide Trail is very challenging -steep, rocky, slabby, and damp.  That - combined with the extensive mileage, makes this a challenging/difficult peak.

Distance:  Our total loop including the bike paths from The Basin parking lot was 10 miles.


Recommendations:  
Gear:  Bring at least 2 L of water per person, snacks, sturdy shoes, AMC Franconia Notch Map, First Aid Kit, Rain Gear, Warm Layer for cold summit, sun protection, and an adventurous spirit.  I also traveled with trekking poles.  This was vital for my descent, but actually got more in the way on the Flume Slide trail ascent because I needed my hands to grab handholds.

Hiking up to the summit of Mt. Flume
More Advice:  Only do this when there is good weather, you have plenty of time, strength, and ability.  I do not really recommend the Flume Slide Trail for families with small children or dogs.  The slide is very steep and had was challenging for me (a very experienced hiker) and Matt (an experienced climber).  Franconia Notch is highly accessible to the Boston area via I-93.  As a result, parking lots fill fast in the summer.  Get there early to avoid parking frustration, congested trails, and crowded peaks.  These peaks are definitely work the trek if you are able.  I'd love to do it again soon.


The perfect way to end the adventure...

After our butt-burning hike, Matt and I rewarded ourselves with a tasty meal and refreshing beverage at the Woodstock Inn Station and Brewery.  This respected watering hole is located off Exit 32 on I-93 in North Woodstock, NH.  It was the perfect ending to the perfect hiking day.


Please leave comments and questions below...


Sunday, August 18, 2013

Waterfalls and Swimming Holes - Vermont Adventures

Bingham Falls Trail, Smugglers Notch


I was fortunate to have my friend Mary invite a group of teacher friends to visit her at their Vermont condo near Stowe.  This is a BEAUTIFUL area, and we enjoyed three days of nature, hiking, and fellowship.   One of the highlights of our stay was visiting the many waterfalls and swimming holes in the area.


Here are three must-see waterfalls/swimming holes in the Stowe area.  


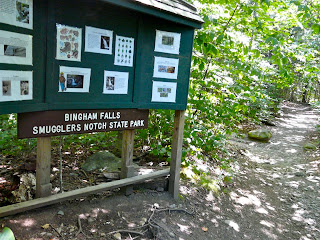
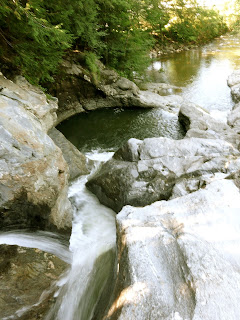
1.  Bingham Falls, Smugglers Notch State Park - A short half mile hike over roots and rocks takes you downhill to a beautiful and hidden pool.  A cascading waterfall meets the pool and small ripples and mini-falls leave the pool through a beautiful stream.  Swimming is allowed in pool, and it's a great place to enjoy nature without a huge hike.  To access these falls, park on the west side of Route 108 just south of the campground entrance.  Cross to the east side and follow the trail.  There is a trailhead sign, but it is hidden away from the road.  The terrain is moderately difficult.

Trailhead sign for Bingham Falls


Bingham Falls
Mary crosses the brook.


2.  Bolton Potholes, Bolton/Waterbury -  A series of small cascades feed perfectly round pools at Bolton Falls near Waterbury, VT.  Even if you aren't swimming, the short, easy walk from the road is worth it to see this impressive geologic feature.  To get there, follow Route 2 west from Waterbury.  Drive 6.5 miles from the intersection of Route 2 and 100 in Waterbury.  Take a right onto Bolton Valley Road.  There is a parking area 0.25 miles on the right.  Do NOT park along side the road as there is a parking ban.  Walk along the road and then walk the 200 feet along a worn trail to the swimming hole.

A summer camp of kids jump into the pools.  
Falls feed the potholes
Rock Sculptures adorn the brook

3.  Moss Glen Falls, C.C. Putnam State Forest - This is the tallest of the three falls.  At a 125 ft vertical drop, Moss Glen Falls is an impressive scene.  A short, 0.25 mile hike over moderate/easy terrain will take you to a view of the falls.  Adventurous swimmers entered near the stream at the base and went swimming in the cool waters at its base.  To get there, take Route 100 north out of Stowe village.  After three miles, take a right onto Randolph Road and then another right on Moss Glen Falls Road. Just before the road makes a sharp right, turn across the brook, and park in the lot straight ahead. A sign will signal the start of the trailhead.

Moss Glen Falls Trailhead
Moss Glen Falls - 125 ft total vertical drop

I really loved exploring some beautiful waterfalls with my friends.  These are all excellent swimming areas as well.  As with any swimming/water adventure - BE CAREFUL.  Use safe swimming practices, and scout the area for hazards prior to entering the water.  Thank you to my friend, Mary, who took us to some of her favorite spots.

Friends enjoy waterfall exploration in Vermont


Please leave comments and questions below.

Saturday, August 10, 2013

A Must-See New Hampshire Lighthouse

Fort Constitution, New Castle, NH

Lighthouses, sailboats, and rugged coastline greeted us on a casual weekend drive in New Hampshire.

After parking, visitors walk
through the US Coast Guard Station
To beat the heat on a recent summer day, Matt took me on a scenic drive along New Hampshire's  18 miles of coastline.  One of my favorite stops along our seacoast adventure was at Fort Constitution State Historic Site in New Castle, NH.

To get to Fort Constitution, we took Route 1B to the US Coast Guard Station located on a peninsula in the northeast corner of New Castle.  Parking was available outside the gates of the Coast Guard Station and was free of charge.  Visitors had to enter the Guard gates on foot and walk on a paved colored strip through the base to the historic park entrance.


Inside the park, we were greeted by impressive views of the Piscataqua River, Atlantic Ocean, and a majestic lighthouse- all underlined by the crumbling walls of the old fort.  Picnicking was
Seawall and Lighthouse
available, and we saw families sharing a meal and playing games on the grass lawn.  I am a die-hard lighthouse fan, and I instantly fell in love with the large light at the fort.  The clear day also awarded me with a view of Maine's Whaleback Lighthouse in the distance.

There are no hiking or walking trails in the park, but I enjoyed photographing the classic New England scene.  Matt had fun climbing around on the fort and exploring the rocky shore below its walls.  This was a perfect stop to view a historic treasure on a summer day.


More Information:

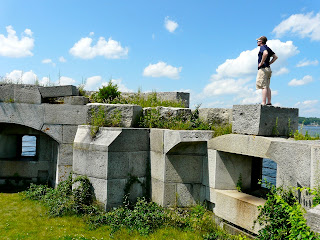
Remnants of Fort Constitution

Fort Constitution has a long history. It is one of seven forts built to protect Portsmouth Harbor.  It has served as a fortress, training location, and battery in multiple wars including the Spanish-American War, War of 1812, Civil War, and WWI and II.  For more information on the history of Fort Constitution, download the NH Parks and Rec Brochure here.


Entry gate to park

View of Whaleback Light across the Piscataqua River

Please leave comments and questions below!